
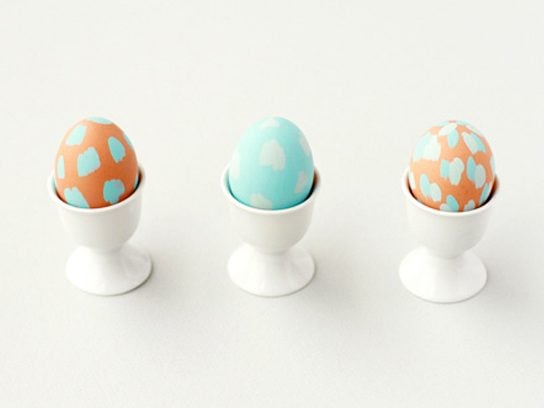
Still merely dunking an Easter egg in dye? This Easter, take your eggs one step further with these different decorating techniques. All of the designs are easy and inexpensive to create, and all of the supplies are available from the supermarket and craft store.
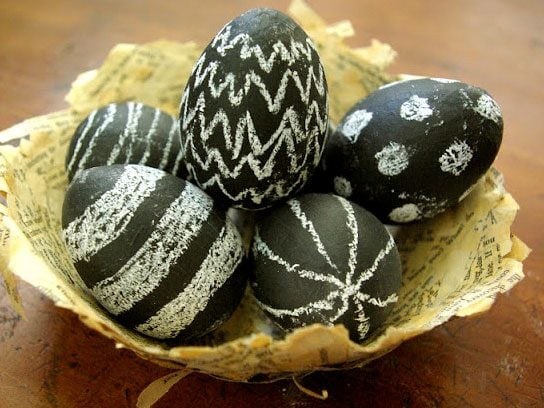
Blackboard Eggs
Write messages on eggshells with this great idea from Oleander and Palm: Coat eggs with a layer of chalkboard paint and let your chalk do the talking. If you fall out of love with a pattern or picture, wash the surface and draw again.
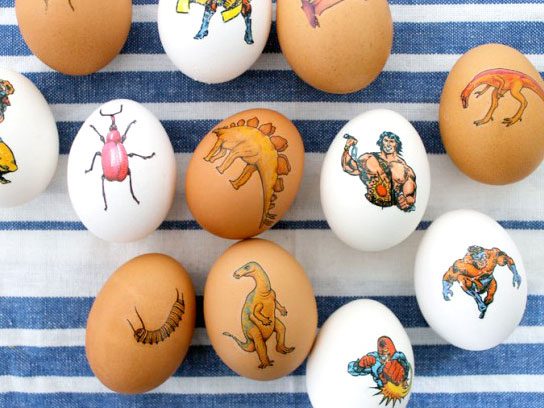
Tattoo Eggs
It’s hard not to fall in love with these cool, no-dye eggs from the geniuses at Brit + Co. Simply apply fake tattoos to eggshells the way you would to your own skin. Instead of bright colors, you’ll get eggs stamped with spiders, superheroes, and more.

Bluebird Egg
Display these side-view birds from Meaghan Mountford in little nests or on a bed of grass. First, dye egg blue and let dry completely. Cut a wing from printed paper (from the craft store; or, recycle Thank You cards) and glue to the side of the egg. Cut a triangle from yellow cardstock, fold a tab at the flat end and adhere to the end of the egg with glue. Let dry. Draw an eye with black marker.
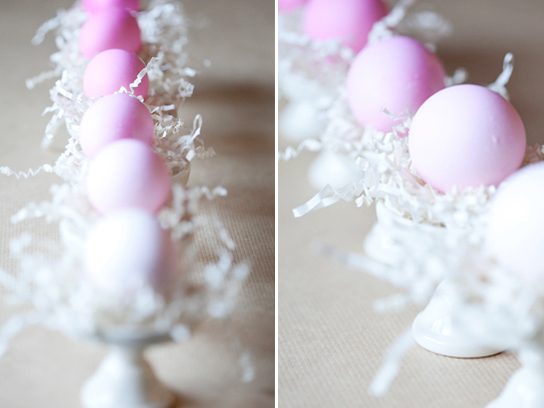
Ombre Eggs
It’s easy to get this trendy look from Sugar and Charm. Prepare dye according to the packaging and let eggs soak for varying amount of time. Take them out quickly for a hint of color and leave them in for longer to get a rich hue.

You Name It Eggs
These personalized eggs from Meaghan Mountford are perfect place cards for Easter dinner. Rest an egg sideways on an egg holder and dip in dye bath of desired color, but hold the egg so the top third of the egg stays above the dye bath and remains white. Let dry completely. Pour a small amount of acrylic craft paint on a plastic plate or wax paper. Dip the non-brush end of a small paintbrush into the paint and dab on egg to create a dot. Paint dots around the white oval. When the paint dries, use letter stickers to spell a name or initial.
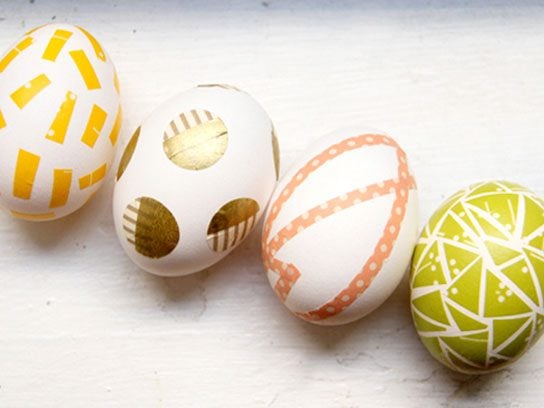
Washi Tape Eggs
Put metallic, patterned and pastel Washi tape to good use with this cute no-dye egg-decorating option from Chelsea at Lovely Indeed. Cut tape into various shapes and stick to egg surfaces.
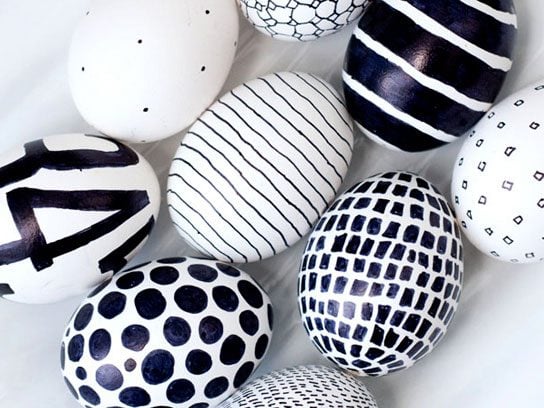
Black and White Eggs
All you need for this monochromatic look is a fine-tipped black permanent marker. At the blog Obviously Sweet, variations of dotted and striped patterns make each egg look unique.
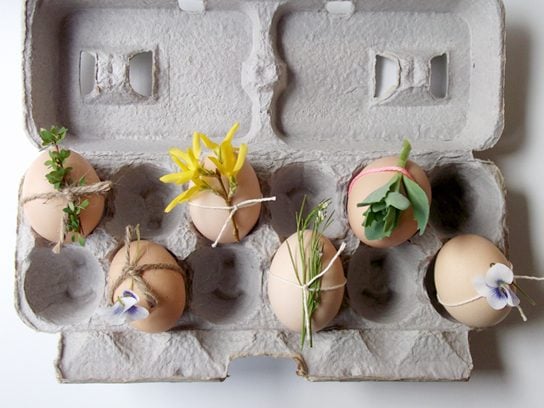
Tied Flowers
For less of a mess, nix the dye. Instead, use string or baker’s twine to secure flowers and herbs to eggs, suggests the clever creator of A Daily Something. Opt for forsythia and violet buds, or try rosemary or thyme for a hint of fragrance.
Impressionist Eggs
Break out some acrylic paint to try this egg-decorating trend from Paper & Stitch. Using short brush strokes, create a basic pattern around a hardboiled egg and let dry!
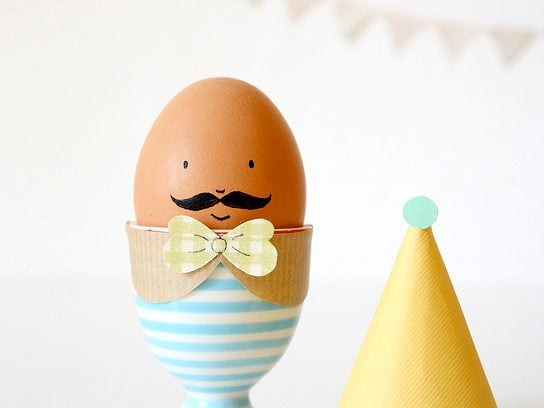
Mustache Eggs
Give fragile shells facial hair with this idea from Oh What Fun. Draw curly and handlebar varieties onto shell surfaces for some dapper-looking eggs.

Lazy Daisy Eggs
The beauty of these eggs from Meaghan Mountford belies how unbelievably easy they are to make. Dye egg desired color and let dry completely. Adhere the stickers and smooth well with your fingers. That’s it! No need to stick with daisies; use other flowers or any design that tickles you.

Preppy Eggs
Grosgrain ribbon gets glued around dyed eggs with this idea from Meaghan Mountford, who suggests you put glue on the ribbon first, then lay an egg at one end of the ribbon and roll until ribbon fully encircles the egg. Snip the end. You may need an extra dab of glue to adhere the snipped end of the ribbon. If you cut your ribbon in a neat, straight line, you need not worry about folding the end over.

Bling Bling Eggs
For a sparkly centerpiece, fill a glass bowl with glitter-dotted eggs with this idea from Meaghan Mountford. Dye egg desired color and let dry completely. Working with one side of the egg at a time, squeeze different size circles of glue on the egg. Holding the egg over a plate, pour glittering glue over the egg and shake off the excess (the egg will still have unwanted glitter, but don’t worry about that yet). Let the egg dry and repeat on the other side of the egg. Let dry several hours at least. When completely dry, carefully brush egg with the dry bristles of an old toothbrush to remove the unwanted glitter. Tip: Use the fine tip on the glue to help you ‘draw’ the circles of glue. Varying the circle size takes the pressure off of squeezing perfect circles.

Speckled Eggs
Mix and match contrasting egg and paint colors to create a bright, speckled collection with this idea from Meaghan Mountford. Dye eggs desired colors and let dry completely. Pour a small amount of acrylic craft paint on a piece of wax paper. Dip an old toothbrush into the paint, and dab the excess on the wax paper. Hold an egg over the wax paper in one hand, and with your other hand, hold the toothbrush about 2 inches over the egg. Run your thumb along the bristles to spray paint on the egg. Let dry. To really simplify things, skip dying the eggs and just speckle white eggs.

The Perfect Pair of Eggs
Try this cute craft from Meaghan Mountford: For bunny, glue a pink pom-pom on a clean egg. Cut out ear shapes from white foam or card stock, dab flat ends of ears with glue, and adhere to the top of the egg. When completely dry, draw eyes and whiskers on the egg with a black marker. For carrot, dye egg orange and let dry completely. Cut 5 pieces of ribbon, each about 10 inches long. Stack the ribbon pieces, fold in half, and staple at the fold. With scissors, curl ribbons. Fold a small tab in the ribbon at the point where you stapled. Dab glue on the tab and adhere to the top of the wider end of the egg. Use invisible tape to hold the ribbon in place until the glue dries. If you use card stock instead of foam, add and cut a tab at the end of each ear to more easily glue to the egg. For the carrot, you can also use a pre-made ribbon gift topper in lieu of cutting and curling your own.

Zoo-egg-ology
Make cute, easy egg animals from Meaghan Mountford. For the frog, dye egg lime green and let dry completely. Cut out a large semi-circle from a piece of green foam and two small semi-circles from white. With a black marker, draw a mouth and eyes, then glue to egg. Use invisible tape to hold on the egg until the glue dries. For the monkey, dye egg light brown and let dry. Cut out a large circle and two small semi-circles from brown foam. With the black marker, draw a nose and mouth, then glue on the egg. When dry, draw on eyes. For the pig, dye egg pink and let dry. Cut out a large circle and two small triangles from pink foam. With the black marker, draw nostrils on the large circle, then glue on the shapes. When dry, draw on eyes. For the chick, dye egg yellow and let dry. Cut out a beak shape from orange foam. With the black marker, draw two lines on the beak and glue on. When dry, draw on eyes. Tip: When cutting out shapes, keep the eggs handy so you cut pieces to scale. Draw the shape with a pencil on the back of the foam first as a guide.

Have a Nice Day Eggs
This blast from the past image from Meaghan Mountford is a super easy way to make your eggs happy. Dye eggs yellow and let dry completely. Draw faces with black marker. Feel free to break from tradition and let your egg express other emotions. Above: ‘Oh no!’ ‘Happy’ and ‘Tee-Hee.’
Source: www.rd.com